See our new Wiki!
This wiki is in legacy mode. Check our new wiki here!
Videogames Blender texturing and baking
Tested on Blender 2.7. Things may have changed on 2.8.
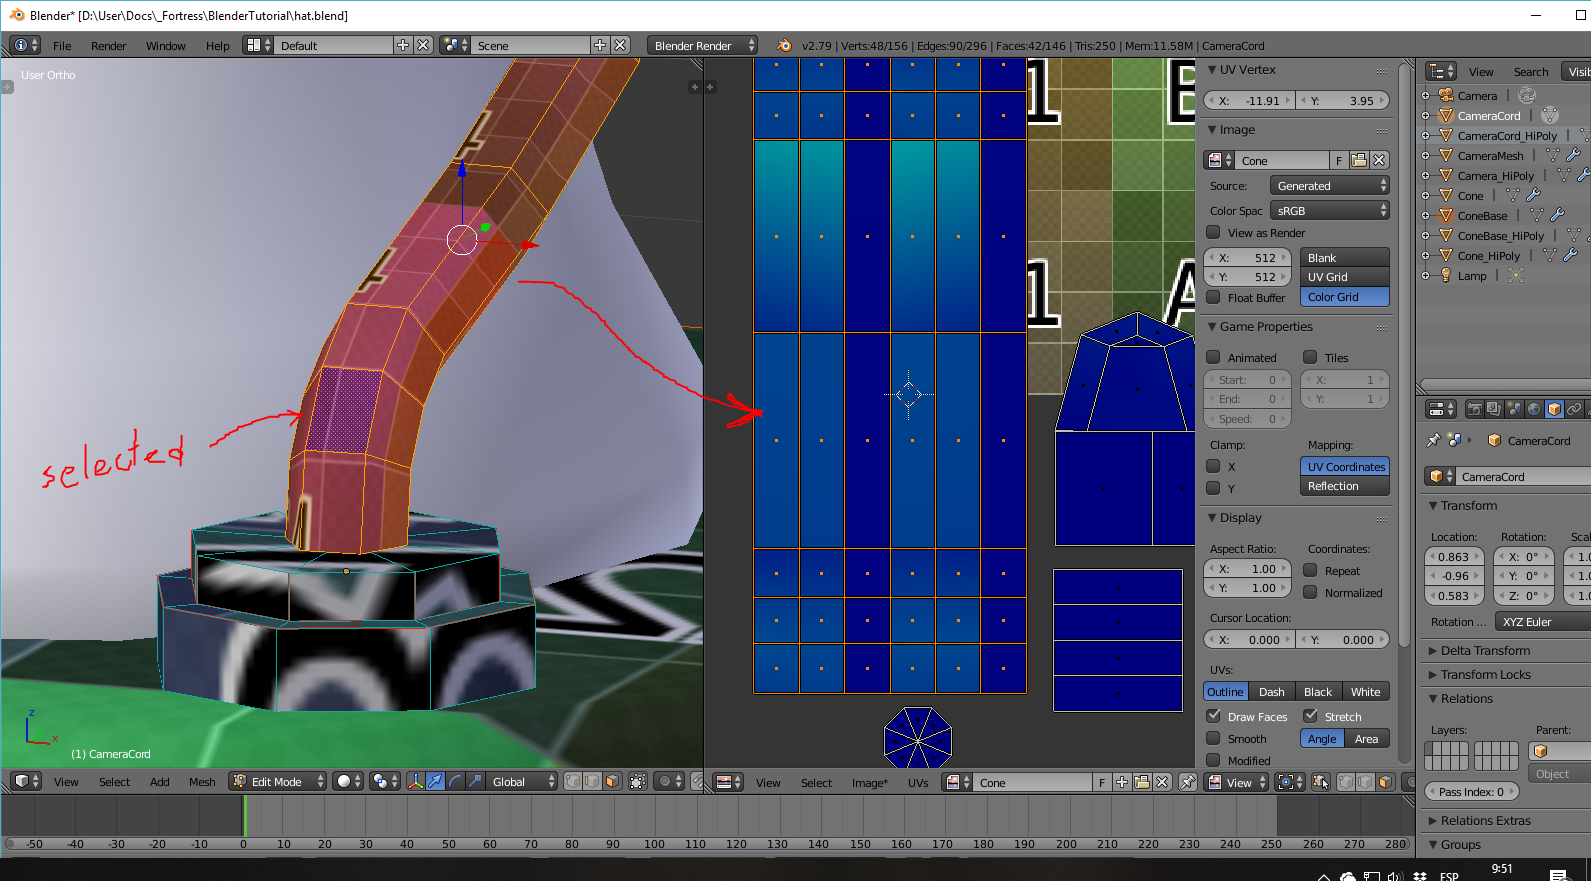
UV-Unwrap
- Unwrap menu [ U ]
- Stitch Islands [ V ]
- Interchange Island [ i ]
- Weld align [ W ]
- Unwrap on the UV Editor view [ E ]
- Stitch Islands [ V ]
- View multiple objects
- Select other objects (be sure that each of them have all vertex selected on the UV Editor) and lastly the object that you’re editing.
- On the View menu enable Draw other objects.
-
Unwrap using same size for each part:
- [ U ] and select Following Quads.
- If it fails [ U ] -> Reset
- Misc from UV Editor
- UVs menu > Seams from Island
- N > Display > Stretch to show UV quality
- New Image > Color grid to show sample UV.
-
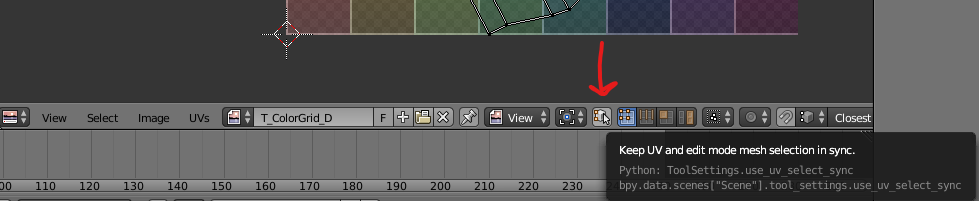
Keep UV mode and mesh selection in sync (Disable this option to edit UV parts).
-
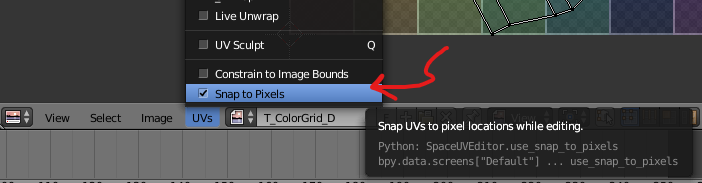
Snap to pixels (recommended to be activated):
- You can add multiple UVs to add more details to some parts of the model and then bake all changes on a single UV. See Texture baking section.
- At Data tab you can add UVs.
- Remove them before exporting.
Baking
Located at Render Menu.
- Ambient Occlusion
- White background image.
- Normals
- Background image RGB: 0.5, 0.5, 1.0.
- Solid color
- Background image alpha. Keep alpha color for empty parts as for exporting we will use a padding algorithm on Gimp (UVPadder) to generate better textures for mipmaps generatio (See exporting section for more information).
Baking with Blender Internal
- General:
- Apply same material to several objects [ ctrl + L]
- Create a new image at the UV Editor, be sure that it is active. Keep a backup of your textures.
- Select Bake Mode and disable Clear at the Render Menu before proceed.
- To bake from a Hi-Poly to a low-poly select Hi then Low. Check Selected to active.
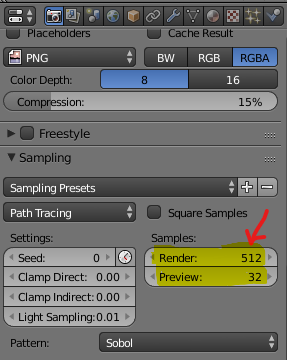
- To improve rendering quality at World menu increase Gathering > Samples (even if it is disabled).
- Textures (last step)
- When you have finished with materials, baking and use this bake option to generate a unique texture with all filters applied.
- It works even when you create multiple UVs to add detail to certain parts of your model.
- Join all meshes into a single one, applying modifiers and select common UV map for a succesful process.
Blender Internal Materials
- Use them to previsualize your changes and also to prepare a Texture baking step.
- Create a material and add textures:
- For the Normals be sure that the affect Geometry > Normal and to select at Image Sampling Normal Map > Tangent.
- For detail textures (over textures) be sure to change the Blending Mode to Multiply.
- Create a material and add textures:
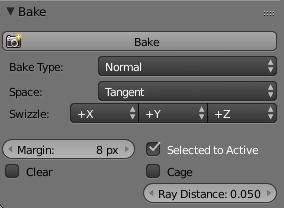
Baking with Cycles
- General:
- Add Nodes [ shift + a ]
- Open Node Editor View.
- Be sure to select the correct Texture Node when backing.
- Select Bake Mode and disable Clear at the Render Menu before proceed.
- To bake from a Hi-Poly to a low-poly select Hi then Low. Check Selected to active.
- Sampling settings:
- Normals:
- To bake from a Hi-Poly to a low-poly select Hi then Low. Check Selected to active.
- Adjust Ray Distance.
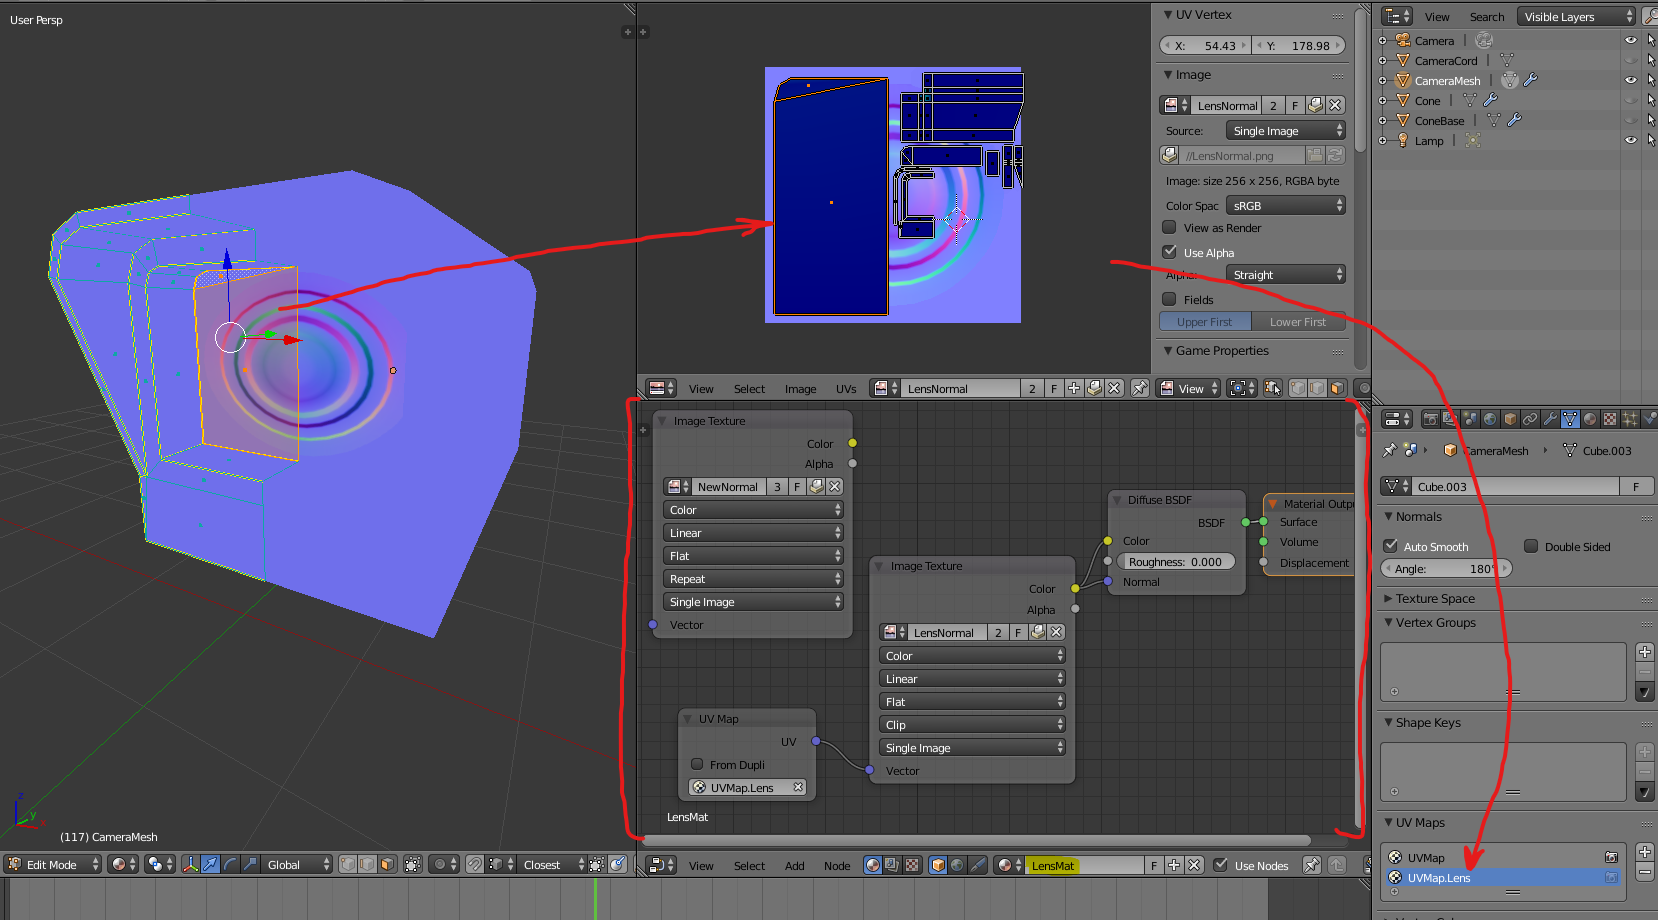
- Baking multiple normals:
- This workarround uses color baking to consolidate multiple UVs into a single one. This procedure is to add more details to a part of the model and then optimize the size by backing everything into a single texture.
- Create different UV-Maps to add more detail and configure a material as here (note the unconnected node for the bake resulting texture):
- Add a material and apply it to the rest of the model, create a Default Normal Texture (RGB: 0.5, 0.5, 1.0.):
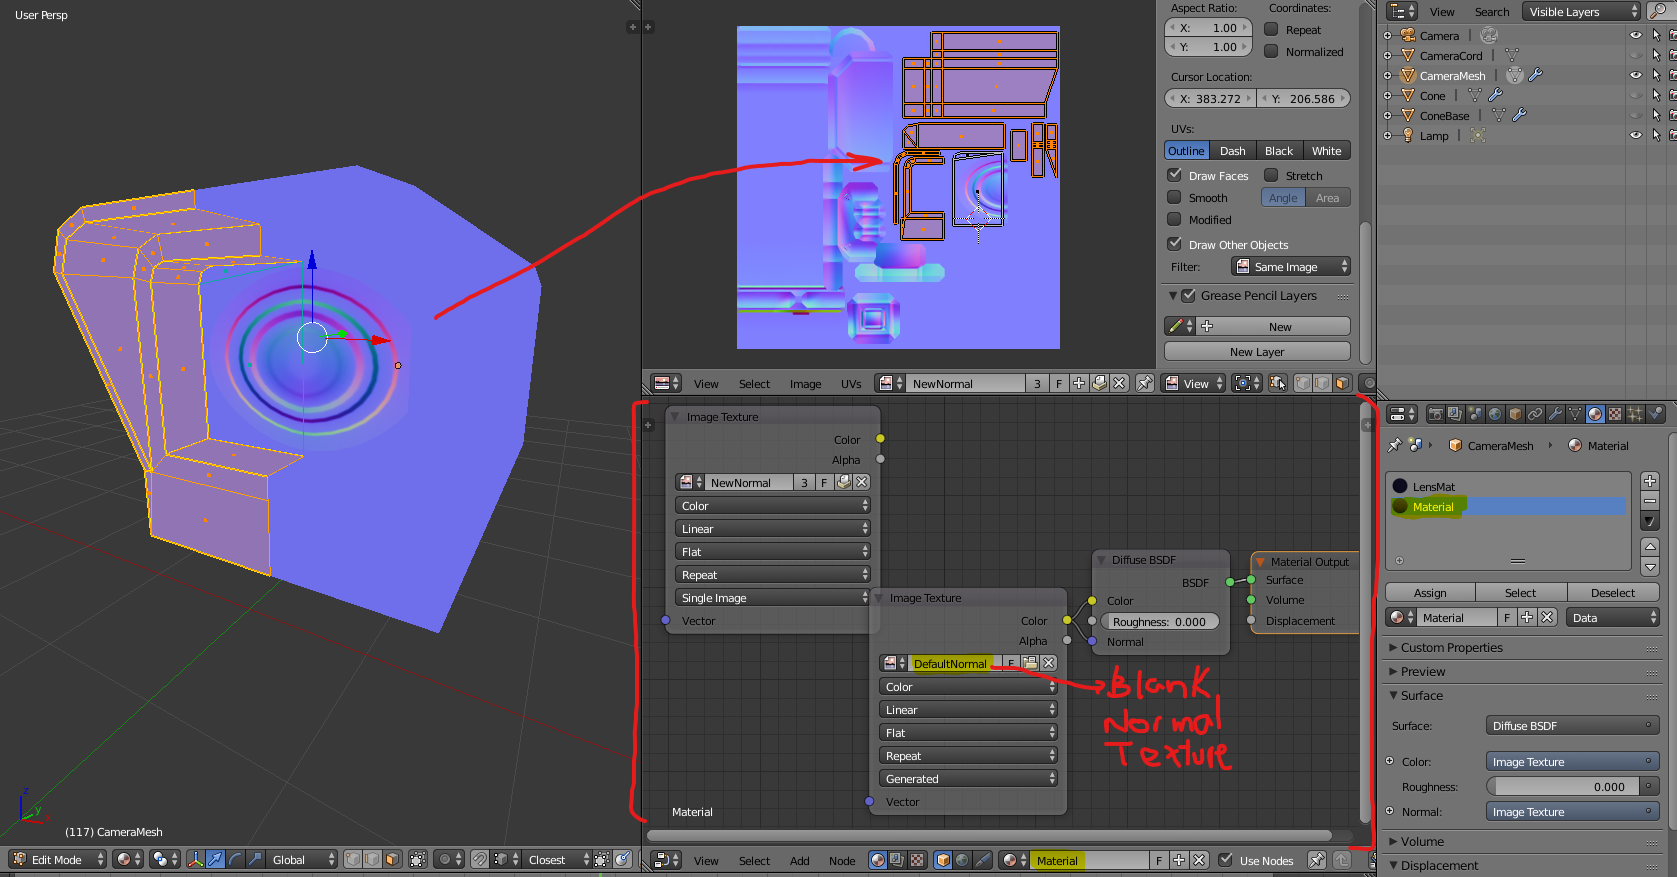
- While selecting the unconnected Resulting Node (Image Texture named: NewNormal in the picture) bake Diffuse Color.

- Baking multiple textures:
- Apply the previous steps but instead of setting a Normal Texture on the color of your Difuse Shader, link your texture.
Baking FAQ:
-
“No object or images found to bake to”:
-
On edit mode selecting all the faces check at the UV editor that you’ve selected the correct image to bake to.
-
Check that the objects are visible for rendering on the Hierarchy menu.

-
Be sure to enable Use the scene’s active camera and layers in this view.
-
Painting
This workflow of Blender is partially broken. It is recommended to use it with caution (to add details and not for a complete asset painting). If you have access to Substance Painter it is better to use it, if not, you can Bake base difusse colors and use Gimp and/or Krita for texture painting.
- General
- Brush size [ F ]
- Strength [ shift + F ]
- Stroke method [ E ]
- Paint: Mix mode.
- Erase: Erase alpha mode.
- Bleed: outer margin to avoid artifacts on compressed versions of the texture. Broken on 2.78 - 2.79c - it is recommended to export them and use UVPadder on Gimp to fix this issue and even create better textures that will not show artifacts when mipmaps are generated on the Game Engine (See Texture Exporting section for more details).
- Add multiple slots for each type of detail. For example:
- Color variation.
- Border details:
- Activate Cavity Mask.
- Add a Subdivide modifier with a Simple subdivision type. DO NOT APPLY IT.
- Gradient:
- Brush: fill-
- Stroke method: line.
- It is recommended to paint everything (specially gradients) using perspective mode with a FOV of 250 [ N menu ].
Equilaterus (CC-BY) 2018 - 2022.